


SnapEngage Chat Integration
Note: If you haven’t added your WhatConverts tracking code to your website, add your tracking script. If you are using the WhatConverts WordPress Plugin, you will want to deactivate the plugin and place your WhatConverts Tracking Code above your SnapEngage Install Code.
1Where your SnapEngage Chat Widget is installed on your page, add the following code directly above your installation code:
<script type="text/javascript">
var source_data = oqhaqzwnbjgcpycneryg('wc_client');
</script>
2Log into SnapEngage. Under Current Widget select "Settings".
![]()
Select "Options" at the top of the Settings Menu. Beside Collect additional information add the following JavaScript Variable: source_data
![]()
Click "Save Changes".
3Go to Zapier and click "Create Zap". Search for and select "Webhooks by Zapier as your Trigger App. Click "Continue". Select "Catch Hook as your Trigger and click "Continue". Copy the webhook URL to your clipboard.
4Go back to SnapEngage. In the Settings Menu select "Integrations". Paste the webhooks URL from Zapier in Integration URL box and click "Save Changes".
![]()
5Go to your page SnapEngage is installed on and start (and end) a chat session.
6Return to the Zapier setup, click "Test trigger". Select one of the "Hooks" Zapier has pulled as a sample.
- Note: Make sure you've selected the test chat you created in the previous step.
Click "Continue".
7Select "Code by Zapier" as your Action App and "Run JavaScript" as your Action Event.
Under Input Data type "source_data" and select the "Javascript Variables" from Step 1 - Catch Hook. Under Code, paste the following:
var [source,medium,campaign,content,keyword,gclid,landing_page,user_id,msclkid] = ['','','','','','','',''];
var data = inputData.source_data.match(/name: source_datanvalue: (.*)/);
if (data[1]) {
    var data_parts = data[1].split('+..+');
    if (data_parts[0])
        source = data_parts[0];
    if (data_parts[1])
        medium = data_parts[1];
    if (data_parts[2])
        campaign = data_parts[2];
    if (data_parts[3])
        content = data_parts[3];
    if (data_parts[4])
        keyword = data_parts[4];
    if (data_parts[5])
        gclid = data_parts[5];
    if (data_parts[6])
        landing_page = data_parts[6];
    if (data_parts[7])
        user_id = data_parts[7];
    if (data_parts[8])
        msclkid = data_parts[8];
}
output = [{source: source, medium: medium, campaign: campaign, content: content, keyword: keyword, gclid: gclid, landing_page: landing_page, msclkid: msclkid}];
Click "Continue". Run a test and click "Continue".
8Click "+" to add an Action Step. Search for and select "WhatConverts" as your Action App and "Create Lead" as your Action Event. Select your WhatConverts profile to integrate with SnapEngage.
- Note: If you have not set up a WhatConverts account in Zapier, you can follow the detailed instructions in Connecting to Zapier.
Set up your Template as follows:
- Lead Type: Chat
Profile: Your WhatConverts Profile
Referrer Source: Step 2 - Source
Referrer Medium: Step 2 - Medium
Referrer Campaign: Step 2 - Campaign
Referrer Content: Step 2 - Content
Referrer Keyword: Step 2 - Keyword
User ID: Step 2 - User ID
Gclid: Step 2 - Gclid
Msclkid: Step 2 - Msclkid
Add the following field under Additional Fields:
- Transcript: Step 1 - Transcripts
Email: Step 1 - Requester Details Emails
Name: Step 1 - Requester Details Name
Chat URL: Step 1 - URL
Click "Continue" and send a test to WhatConverts. When the test is successful, you can name your Zap and turn your Zap "on".
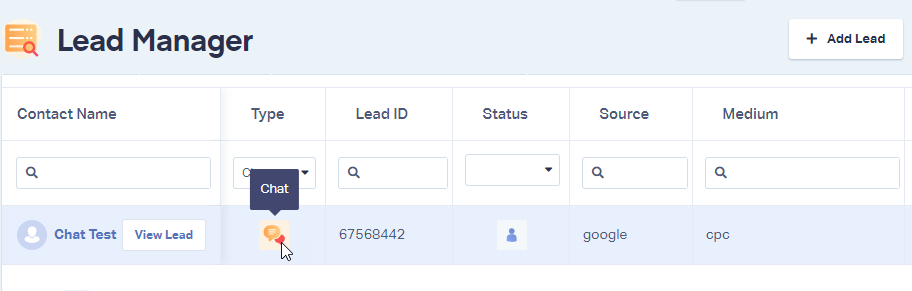
9Go to your website. Start and end a new chat. Log into the WhatConverts profile you have set up the SnapEngage integration in. Click "Leads" in the top menu. Under Lead Manager, check for a new Chat Lead to ensure SnapEngage Chat is tracking properly.
If you have any questions, please contact us here: Contact WhatConverts Support or email support@whatconverts.com
Get a FREE presentation of WhatConverts
One of our marketing experts will give you a full presentation of how WhatConverts can help you grow your business.
Schedule a Demo


