Browse Help Center
Browse Help Center
Join 20,000+ other marketers and start getting marketing clarity

Subscribe to our newsletter and get proven marketing strategies for growing your business.

    Related Integrations
    Calendars and Bookings Calendly

    Last update on July 21, 2022

    Calendly
    CRMs Zoho CRM

    Last update on July 22, 2022

    Zoho CRM
    Landing Pages & Site Builders LeadPages

    Last update on July 22, 2022

    LeadPages
    Help Center Integrations Salesforce Integration

    Sending Web Form Leads to Salesforce


    1Log into Zapier and click "Create Zap". Select "WhatConverts" as your Trigger App and "New Lead" as the Trigger event.

      We highly recommend setting up Field Mapping prior to completing this step.

    Connect your WhatConverts account and click "Continue".

    On the Set up trigger page, select "Yes" only for "Web Forms". Select your profile from the drop down and click "Continue". Select "Test trigger". Select a lead from the drop-down and click "Continue".

      Note: If no lead is found, submit a test form and re-test this step of your Zap.

    2Search for and select "Salesforce" as your Action App and "Create Lead" as your Action Event. Click "Continue".

    Choose or Connect your Salesforce account and click "Continue".

    3On the Set up action page, fill in the Salesforce input fields as follows:

      Last Name: "Mapped Fields Contact Name".
      Company: "Mapped Fields Contact Name" and/or "Mapped Fields Company Name".
        Note: Company is a required field. Make sure to use a dynamic field that always has data or the Zap will not process your Lead.

      City: "Mapped Fields City" (if available)
      State/Province: "Mapped Fields State/Province" (if available)
      Country: "Mapped Fields Country" (if available)
      Phone: "Mapped Fields Phone Number"
      Email: "Mapped Fields Email"

    Description: Type in the following then choose the counterpart from the drop down

      Source: "Source"
      Medium: "Medium"
      Campaign: "Campaign"
      Content: "Content"
      Keyword: "Keyword"
      Landing Page: "Landing URL"
      Lead Page: "Lead URL"
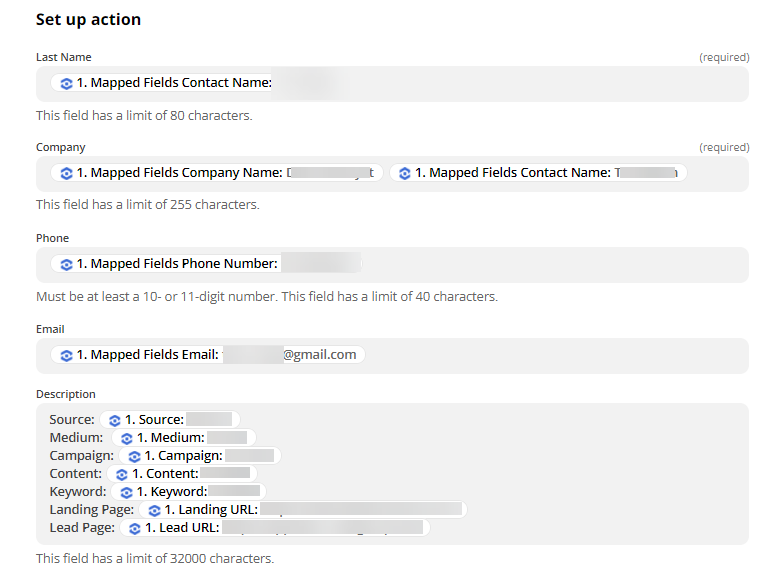
    Set up Web Form to pass to Salesforce

    Click "Continue".

    4On the Test action page, review your data and click "Test & Continue" to send the Lead to Salesforce.

    Turn the Zap "On".

    Test your Zap

    1Go to your website and submit a test form. Navigate to the WhatConverts Profile the form is tracking in. Click "Leads" in the top menu. Under Lead Manager, check to make sure your form submission has been recorded.

    Standard Form Tracking Test

    2Once you have confirmed the Web Form lead has tracked, log into your Salesforce account. Go to the "Leads" tab on the top menu. Click on the most recent lead and compare it to the data tracked in WhatConverts.

    If you have any questions, please contact us here: Contact WhatConverts Support or email support@whatconverts.com

    This article covers how to add Web Form Tracking to Salesforce using Zapier.

    1Go to your website and submit a test form. You can confirm the submission in your WhatConverts dashboard. Go to the WhatConverts Trigger in your "WhatConverts to Salesforce" Zap. Under Test this Step, and click "Re-test WhatConverts to get another lead" to retrieve the new form submission.

    retest your Zap to get new lead

    After you have fetched the new lead click "View Your Lead" and confirm your test form is the lead.

    2Edit your Zapier Salesforce template by logging on to your Zapier account, and find your WhatConverts Zap. Click "Edit Template".

    Edit Zapier Template

    3Define Web Form Field Values to track. On the Set up Salesforce Lead menu, select and add values that are on the form you are trying to track. For this example, we will use the values: "Name", "Company Name", "Email" and "Phone Number".

    Set up your Template from WhatConverts to Zapier for Form Tracking

    "Company Name"

    Set up your Company name in the template from WhatConverts to Zapier for Form Tracking

    "Email"

    Set up your Email in the Template from WhatConverts to Zapier for Form Tracking in Salesforce

    "Phone Number"

    Connect your WhatConverts leads' phone numbers in Zapier to Salesforce

    4Scroll to the bottom of the page and click "Continue". You will see a Test Successful! screen. Click the orange "Finish" button. On the next page you will see the text, Awesome! your zap is working.

    Click Finish

    Test your Zap to make sure your leads are being sent to Salesforce

    Test your Zap

    5Go to your website and submit a test form submission, then navigate to your WhatConverts dashboard and find the web form lead you just submitted. Click on the eyeball symbol on the left side of the row. This will show you lead details.

    Submit a new test form

    Check inside of your WhatConverts dashboard for your new lead

    Confirm your Form Submission

    Once you have confirmed the Web Form lead is in the WhatConverts dashboard, log back into your Salesforce account.  and click the "Leads" tab on the top menu. You should see the lead you entered in your website at the top of the list. Click the lead to confirm that all information is correct.

    Check for your form submission in Salesforce

    Check for your form submission in Salesforce

    Now anytime a lead is generated on your website, WhatConverts will track the lead on your dashboard and push the information in to Salesforce. Salesforce will then display the information as a new lead and show the fields that were set in the Action Step in Zapier.

    Was this page helpful?
    👍Yes
    👎No
    Get a FREE presentation of WhatConverts

    One of our marketing experts will give you a full presentation of how WhatConverts can help you grow your business.

    Schedule a Demo
    Whatconverts Features for your Business
    Filter/Group by Custom Field
    Lead Management Filter/Group by Custom Field

    Different businesses may need different data fields, and WhatConverts knows that.

    Export Current Data Set
    Lead Management Export Current Data Set

    Simply download only the visible columns you have pulled up in your dashboard.

    Instant Triggered Webhook Data
    Analytics & Insights Instant Triggered Webhook Data

    The instant a lead is received, the data trigger can send webhook data to your CRM.

    Call Flows - Geographic Call Routing
    Lead Tracking Call Flows - Geographic Call Routing

    All incoming calls will be directed to the business location closest to the caller.

    Join 20,000+ other marketers and start getting marketing clarity

    Subscribe to our newsletter and get proven marketing strategies for growing your business.

      Related Integrations
      Chat Livechat

      Last update on September 1, 2022

      Livechat
      Forms Caldera Forms

      Last update on July 22, 2022

      Caldera Forms
      Chat ApexChat

      Last update on July 22, 2022

      ApexChat
      ready to get marketing clarity?

      Grow your business with WhatConverts

      14 days free trial Easy setup Dedicated support
      G2 Users Love Us Badge
      G2 High Performer Badge
      G2 High Performer Small Business Badge
      G2 Momentum Leader Badge
      G2 High Performer Europe Badge