

Track Re:amaze Chats
Re:amaze is a customer service and messaging platform that helps businesses manage support through live chat and help desk tools. You can track Re:amaze chat conversations in WhatConverts by adding custom code to your website and configuring a Zapier automation. This integration ensures your chat leads include complete marketing attribution data like source, medium, and campaign.
Note: If you haven't added your WhatConverts tracking script to your website, add your tracking script. If you are using the WhatConverts WordPress Plugin, you will want to deactivate the plugin and place your WhatConverts Tracking Code above your Re:amaze Installation Code.
Set Up Re:amaze Chat Tracking
To capture lead data from Re:amaze, you must modify your existing installation script and connect it to WhatConverts via Zapier.
Step 1: Add Tracking Code to Your Website
Locate the Re:amaze Installation Code on your website and add the custom tracking variables as follows:
- Immediately after the <script> tag that loads reamaze.js, add this snippet to initialize the tracking variables:
var cookie = oqhaqzwnbjgcpycneryg('wc_client'); var source = '', medium = '', campaign = '', content = '', keyword = '', gclid = '', landing_page = '', user_id = '', msclkid = ''; - At the end of your Re:amaze Installation Code, but before the closing </script> tag, add the following logic to map the cookie data to Re:amaze custom fields:
  if (cookie) {
      var cookie_parts = cookie.split('+..+');
      if (cookie_parts[0]) source = cookie_parts[0];
      if (cookie_parts[1]) medium = cookie_parts[1];
      if (cookie_parts[2]) campaign = cookie_parts[2];
      if (cookie_parts[3]) content = cookie_parts[3];
      if (cookie_parts[4]) keyword = cookie_parts[4];
      if (cookie_parts[5]) gclid = cookie_parts[5];
      if (cookie_parts[6]) landing_page = cookie_parts[6];
      if (cookie_parts[7]) user_id = cookie_parts[7];
      if (cookie_parts[8]) msclkid = cookie_parts[8];
  }
  _support['custom_fields'] = {
      source: {
          type: 'hidden',
          value: source,
          pos: 1
      },
      medium: {
          type: 'hidden',
          value: medium,
          pos: 2
      },
      campaign: {
          type: 'hidden',
          value: campaign,
          pos: 3
      },
      content: {
          type: 'hidden',
          value: content,
          pos: 4
      },
      keyword: {
          type: 'hidden',
          value: keyword,
          pos: 5
      },
      gclid: {
          type: 'hidden',
          value: gclid,
          pos: 6
      },
      landing_page: {
          type: 'hidden',
          value: landing_page,
          pos: 7
      },
      msclkid: {
          type: 'hidden',
          value: msclkid,
          pos: 8
      },
      user_id: {
          type: 'hidden',
          value: user_id,
          pos: 9
      }
  };
Step 2: Configure the Zapier Trigger
- Log in to Zapier and click "Create Zap".
- Select "Re:amaze" as your Trigger App and "New Conversation" as the Trigger Event.
- Link your Re:amaze account using your email, brand subdomain, and Re:amaze API key.
- Create a test conversation on your website.
- In Zapier, click "Test Trigger", review the test lead, and click "Continue".
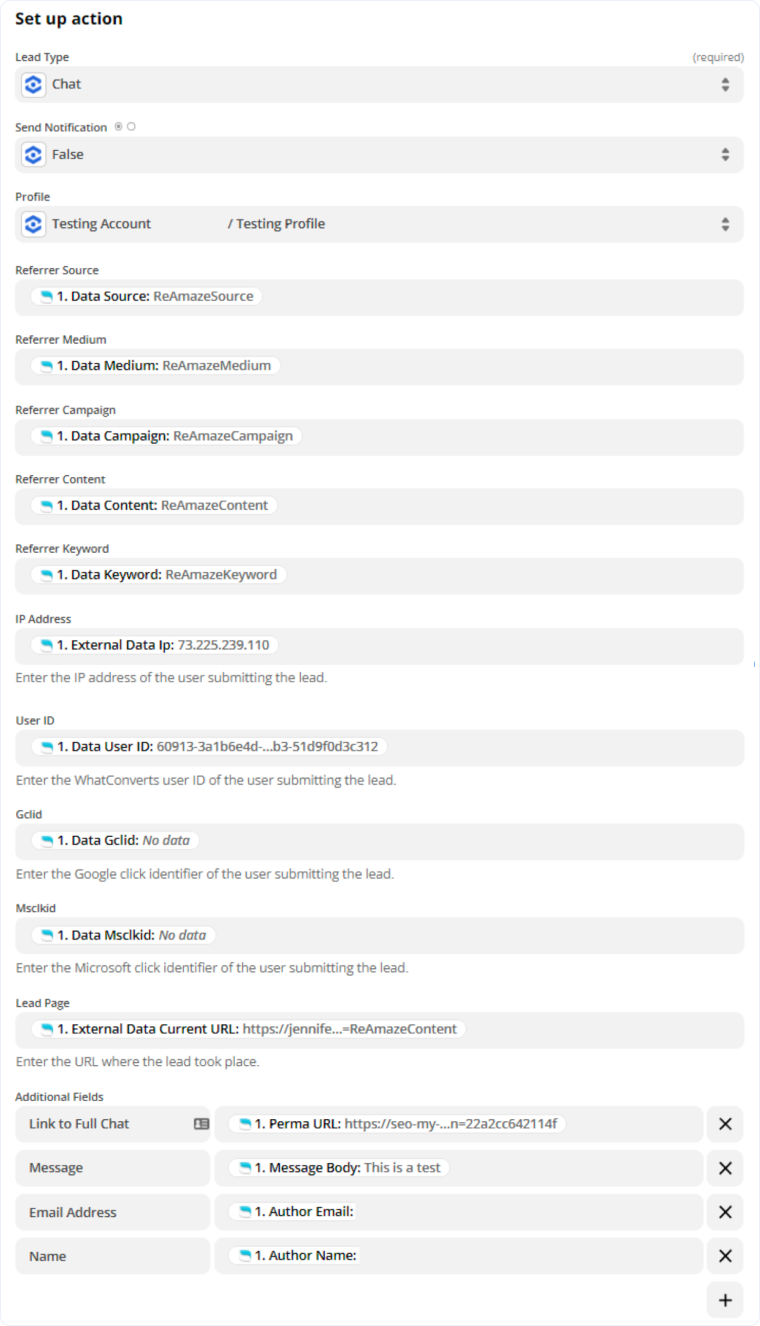
Step 3: Map Fields to WhatConverts
- Add an Action Step and select "WhatConverts" as the Action App.
- Select "Create Lead" and click "Continue".
- Select your WhatConverts profile.
- Set up the Zapier template using these mappings:
- Lead Type: Chat
- Profile: Your WhatConverts Profile
- Referrer Source: Data Source
- Referrer Medium: Data Medium
- Referrer Campaign: Data Campaign
- Referrer Content: Data Content
- Referrer Keyword: Data Keyword
- IP Address: External Data Ip
- User ID: Data User ID
- Gclid: Data Gclid
- Msclkid: Data Msclkid
- Lead Page: External Data Current URL
- Add these fields under Additional Fields:
- Link to Full Chat: Perma URL
- Message: Message Body
- Email address: Author Email
- Name: Author Name
- Click "Continue", send a test to WhatConverts, and turn your Zap on.
Related Topics
Get a FREE presentation of WhatConverts
One of our marketing experts will give you a full presentation of how WhatConverts can help you grow your business.
Schedule a Demo


