Pushing Facebook Lead Ads to WhatConverts
1Log into your Zapier account and click the "Create Zap" button.
2Select "Facebook Lead Ads" as your Trigger App. Select "New Leads" as your Trigger Event. Connect your Facebook Lead Ads Account. Select the Page of your Facebook Lead Ad and Form of Your Facebook Lead Ad from the drop-down menus. Click "Continue".
Click "Test Trigger". Review the lead data and click "Continue".
3Select "WhatConverts" as your Action App and "Create Lead" as the Action Event. Select or connect your WhatConverts account.
- Note: If you have not set up a WhatConverts account in Zapier, you can follow the detailed instructions in Connecting to Zapier.
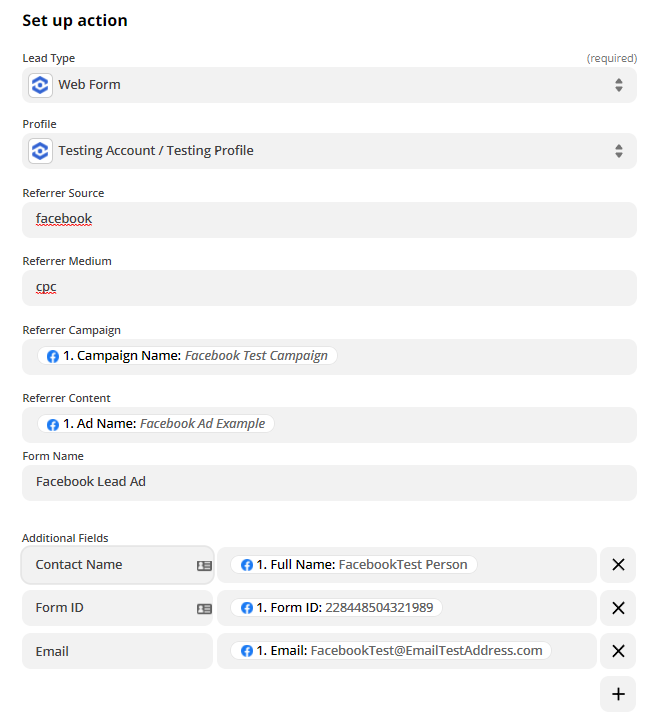
Set up the Customize Lead page with the field values below:
- Lead Type: Select "Web Form" from the drop-down menu
Profile: Select your WhatConverts Profile from the drop-down menu.
Referrer Source: Type "facebook"
Referrer Medium: Type "cpc"
Referrer Campaign: Select "Campaign Name"
Referrer Content: Select "Ad Name"
Form Name: Type "Facebook Lead Ad"
Under Additional Fields, type in the field name and select the corresponding field from the drop-down. In the example below:
- Contact Name: "Full Name"
Form ID: "Form ID"
Email Address: "Email"
Click "Continue". Select "Test & Continue" to send the sample lead to WhatConverts. Give your Zap a Name and turn your Zap "On".
4Go back to your WhatConverts profile. Select "Leads" from the top menu. Scroll down to the Lead Manager. You should see form submission you pushed from Zapier in the list.

To review the full Lead Details for the submission, including all of the form input data, click "View Lead" as shown in the image above.
If you have any questions, please contact us here: Contact WhatConverts Support or email support@whatconverts.com
Get a FREE presentation of WhatConverts
One of our marketing experts will give you a full presentation of how WhatConverts can help you grow your business.
Schedule a Demo


