


Track HappyFox Chats
HappyFox Chat is a real-time customer support software that allows businesses to connect with website visitors instantly. You can track these chat conversations in WhatConverts using Zapier and custom script modifications. This integration captures marketing attribution data, such as source, medium, and campaign, for every chat lead generated.
Note: If you haven't added your WhatConverts tracking script to your website, add your tracking script. If you are using the WhatConverts WordPress Plugin, you will want to deactivate the plugin and place your WhatConverts Tracking Code above your HappyFox Installation Code.
Set Up HappyFox Chat Tracking
To track HappyFox chats, you must modify your installation script to capture visitor cookies and pass them into HappyFox custom fields.
Step 1: Add Tracking Code to Your Website
Locate your HappyFox Installation Code on your website. Directly before the closing </script> tag, add the following code:
  var cookie = oqhaqzwnbjgcpycneryg('wc_client');
  var source = '',
      medium = '',
      campaign = '',
      content = '',
      keyword = '',
      gclid = '',
      landing_page = '',
      user_id = '',
      msclkid = '';
  if (cookie) {
      var cookie_parts = cookie.split('+..+');
      if (cookie_parts[0])
          source = cookie_parts[0];
      if (cookie_parts[1])
          medium = cookie_parts[1];
      if (cookie_parts[2])
          campaign = cookie_parts[2];
      if (cookie_parts[3])
          content = cookie_parts[3];
      if (cookie_parts[4])
          keyword = cookie_parts[4];
      if (cookie_parts[5])
          gclid = cookie_parts[5];
      if (cookie_parts[6])
          landing_page = cookie_parts[6];
      if (cookie_parts[7])
          user_id = cookie_parts[7];
      if (cookie_parts[8])
          msclkid = cookie_parts[8];
  }
  var HappyFoxChat;
  window.HFCHAT_CONFIG.onload = function() {
      HappyFoxChat = this;
      HappyFoxChat.setCustomFields({
          source: source
      })
      HappyFoxChat.setCustomFields({
          medium: medium
      })
      HappyFoxChat.setCustomFields({
          campaign: campaign
      })
      HappyFoxChat.setCustomFields({
          content: content
      })
      HappyFoxChat.setCustomFields({
          keyword: keyword
      })
      HappyFoxChat.setCustomFields({
          landing: landing_page
      })
      HappyFoxChat.setCustomFields({
          user_id: user_id
      })
      HappyFoxChat.setCustomFields({
          gclid: gclid
      })
      HappyFoxChat.setCustomFields({
          msclkid: msclkid
      })
  };
Save your changes and clear any caching plugins on your site.
Step 2: Configure HappyFox Custom Fields
- Log in to HappyFox Chat.
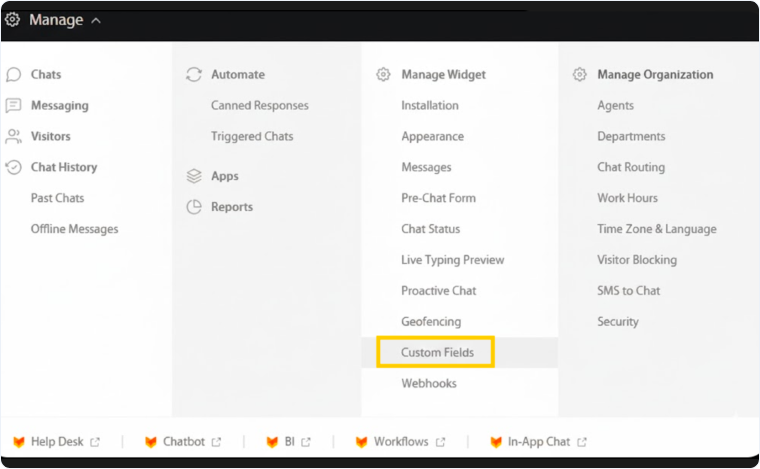
- Select "manage" in the top left of your dashboard.
- Under manage widget, click "custom fields".
- Click "+ add". In the name field, type source and select text as the type.
- Repeat this process for each of the following fields: medium, campaign, content, keyword, gclid, landing_page, user_id, and msclkid.
Step 3: Configure the Zapier Trigger
- In a new tab, log in to Zapier and click "create zap".
- Select "Webhooks by Zapier" as the trigger app and "catch hook" as the trigger.
- Click "continue" and copy the custom webhook URL.
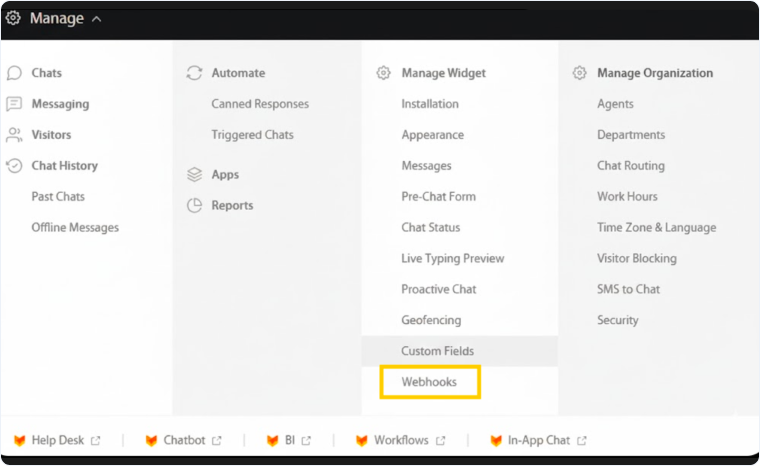
- Go back to HappyFox, select "manage", then click "webhooks" under manage widget.
- Paste the custom webhook URL into the box and click "save".
Step 4: Map Fields and Format Data
Open an incognito window and visit your website using the test URL below.
?utm_source=HappyFoxTestSource&utm_medium=HappyFoxTestMedium&utm_keyword=HappyFoxTestKeyword&utm_content=HappyFoxTestContent&utm_campaign=HappyFoxTestCampaign&gclid=TestGclid&msclkid=TestMSClkID&force_utm=true&wc_clear=true
- Start and end a chat session using a unique email address.
- Return to Zapier, click "test trigger", and review the captured data.
- Add an action step using "Formatter by Zapier" with the "text" action event.
- Select "URL decode" under transform and choose "payload custom fields landing page" as the input.
- Add a final action step for "WhatConverts" and select "create lead".
- Select your WhatConverts profile and map your fields accordingly.
- Turn your Zap on.
Related Topics
Get a FREE presentation of WhatConverts
One of our marketing experts will give you a full presentation of how WhatConverts can help you grow your business.
Schedule a Demo