

Set Up Facebook Tracking
The Facebook Integration sends your WhatConverts lead data back to Facebook Ads for campaign optimization. Once connected, Facebook's algorithm uses your conversion data to find more qualified prospects and improve your return on ad spend.
Before You Begin
Make sure you have:
- A Facebook Ads account with active campaigns
- Your Meta Pixel ID installed on your website
- WhatConverts tracking set up to capture conversions (calls, forms, chats, etc.)
Connect Facebook Ads
Follow these steps to connect your Facebook Ads account:
- In your WhatConverts profile, click Tracking in the top menu.
- Select “Integrations”.
- Find Facebook Ads in the list of available integrations and click “Connect”.
- Select “Add Connection”.
- You'll be redirected to Facebook to authorize the connection. Log in with your Facebook account credentials if prompted.
- Grant WhatConverts permission to access your Facebook Ads account.
- Select the Facebook Ad Account you want to connect from the dropdown menu.
- Choose your tracking preferences:
- Event name: Select the conversion event name WhatConverts will send.
- What clicks to use: Choose whether conversions should be attributed to the first click or last click within the selected lookback window (X days).
- When to send conversions: Choose what should trigger a conversion to be sent. The default is New lead received, which includes all incoming leads.
- Conversion value (if available): Choose which value to send (for example, Quote Value or Sales Value).
- Lead types to include: Select which lead types should trigger conversions. For phone calls, you can also set a minimum call duration (seconds).
- Advanced matching: Toggle this on to enable advanced matching (recommended for better optimization).
- Conversion events to send: Select which conversion events you want to send.
- Click “Save” to complete the setup.
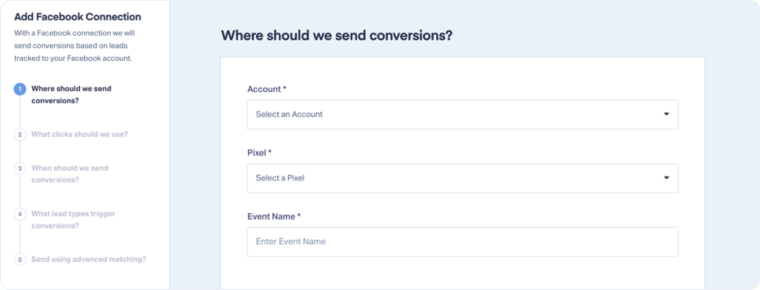
Once connected, WhatConverts will automatically send conversion data back to Facebook Ads based on your selected triggers and matching preferences.
Find and Enable the WhatConverts Conversion Event in Facebook Ads Manager
Note: After completing the integration, Facebook may take up to 3 days to display the new conversion event.
To find and enable the event created by WhatConverts:
- Go to Facebook Ads Manager and open the Events Manager.
- Navigate to Data Sources.
- Go to Pixel, and select the Pixel you used during setup.
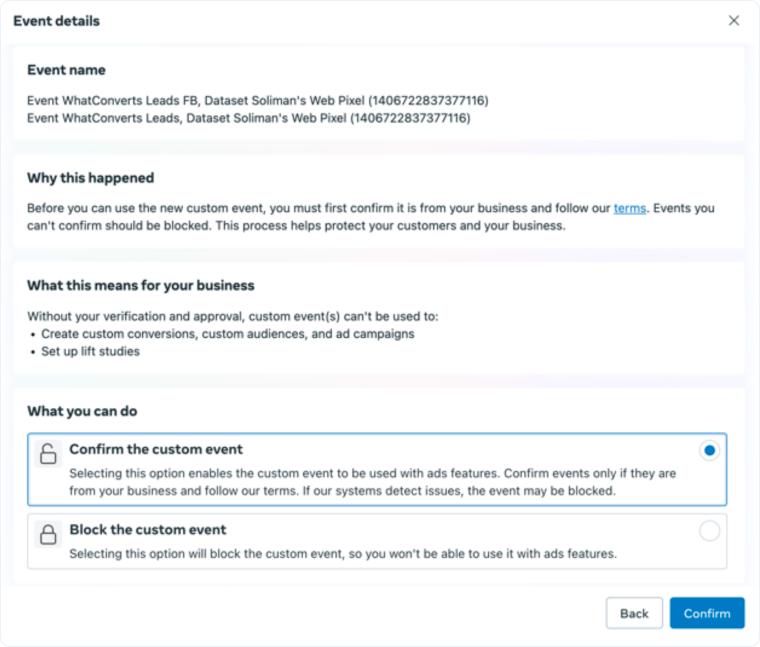
- Locate the custom event created by WhatConverts.
- If required, click “Review” next to the event and follow Facebook’s prompts to confirm and enable it.
Edit the Facebook Integration Settings
You can update your Facebook integration settings at any time:
- From your WhatConverts profile, go to “Tracking” and open “Integrations”.
- Find Facebook Ads in your connected integrations and select “View Details”.
- Click “Edit Connection”.
- Update your preferences:
- Change which lead types trigger Facebook conversions
- Enable or disable Advanced Matching
- Adjust if conversion values are sent
- Click “Update Connection” to apply your changes.
Disconnect Facebook Ads
If you need to remove the Facebook Ads connection:
- From your WhatConverts profile, go to “Tracking” and open “Integrations”.
- Find Facebook Ads in your connected integrations.
- Click “Disconnect”.
- Confirm you want to disconnect the integration.
Once disconnected, WhatConverts will stop sending conversion data to Facebook Ads.
Related Topics
Get a FREE presentation of WhatConverts
One of our marketing experts will give you a full presentation of how WhatConverts can help you grow your business.
Schedule a Demo