


Send Appointments from ServiceTitan to WhatConverts
Create a Zapier workflow that automatically sends appointment data from ServiceTitan to WhatConverts.
Before You Begin
Make sure you have:
- Your ServiceTitan API credentials (Tenant ID, Client ID, and Client Secret)
- See Connect WhatConverts to ServiceTitan for information on how to access this information.
- Your WhatConverts API key:
- For Master Account integrations: Generate a Master API Key
- For Profile integrations: Generate a Profile API Key
- A Zapier account
Create Your Appointments Workflow
To build a Zapier workflow for sending appointments from ServiceTitan to WhatConverts:
Step 1: Set Up the Trigger
- Log in to your Zapier account.
- In the left-hand menu, click "+ Create", then click "Zaps".
- Use the AI Copilot to enter the integration you are setting up, or click the "Trigger Box" and search for "ServiceTitan".
- Choose "New Appointment" as the trigger event.
- Click "Continue".
- Connect your ServiceTitan account using your Tenant ID, Client ID, and Client Secret.
- Test the trigger to verify the connection works and review sample appointment data.
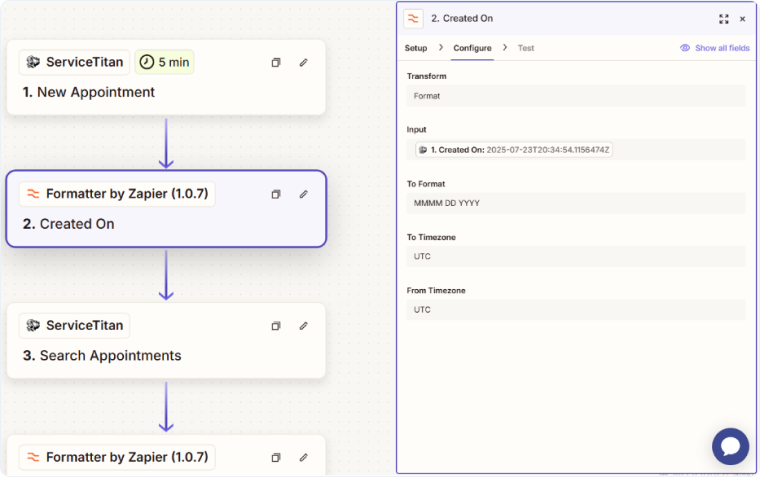
Step 2: Format the Created Date
- Click the "+" button to add a new step.
- Search for and select "Formatter by Zapier".
- Choose "Date/Time" as the event.
- Select "Format" as the transform option.
- In the "Input" field, map the "Created On" field from the ServiceTitan trigger.
- Set "To Format" to "MMMM DD YYYY".
- Set both "To Timezone" and "From Timezone" to "UTC".
- Test this step.
Step 3: Search for Appointment Details
- Add a new step and select "ServiceTitan" as the app.
- Choose "Search Appointments" as the action.
- In the "Appointments IDs" field, map the "ID" field from Step 1 (the ServiceTitan trigger).
- Test this step to retrieve detailed appointment information.
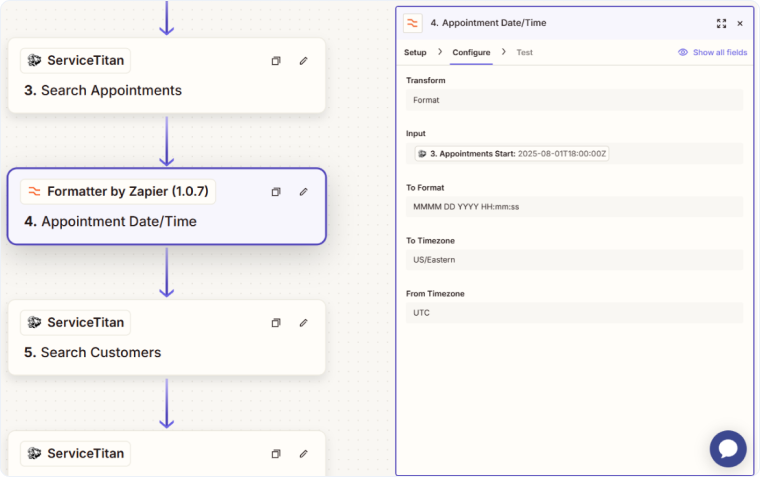
Step 4: Format the Appointment Start Time
- Add a new "Formatter by Zapier" step.
- Choose "Date/Time" as the event and "Format" as the transform.
- In the "Input" field, map the "Appointments Start" field from Step 3.
- Set "To Timezone" to "US/Eastern" (or your local timezone).
- Set "To Format" to "MMMM DD YYYY HH:mm:ss".
- Set "From Timezone" to "UTC".
- Test this step.
Step 5: Search for Customer Information
- Add a new ServiceTitan step.
- Choose "Search Customers" as the action.
- In the "Customers ID" field, map the "Appointments Customer ID" from Step 3.
- Test this step to retrieve customer details.
Step 6: Search for Customer Contact Information
- Add another ServiceTitan step.
- Choose "Search Customer Contacts" as the action.
- In the "Customer ID" field, map the "Customers ID" from Step 5.
- Test this step to retrieve contact details (phone, email, etc.).
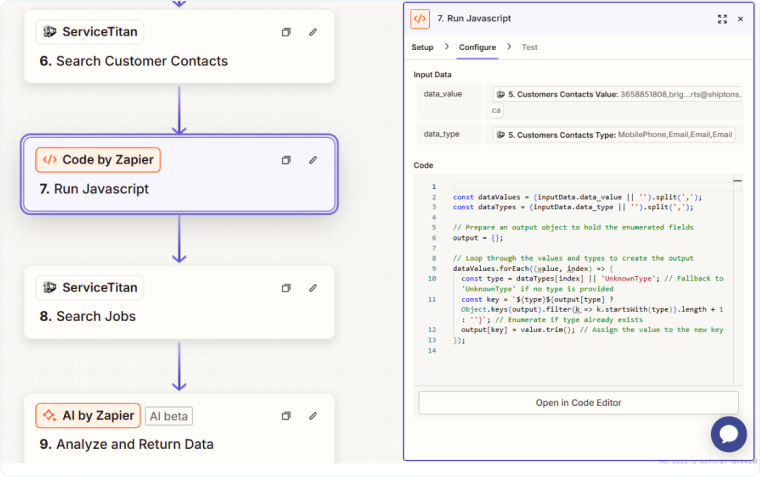
Step 7: Process Contact Information with Code
- Add a "Code by Zapier" step.
- Choose "Run Javascript" as the action.
- In the "Input Data" section, add two fields:
- Field name: data_value, then map "Customers Contact Value" from Step 6
- Field name: data_type, then map "Customers Contact Type" from Step 6
- In the "Code" field, paste this JavaScript:
JavaScript
 const dataValues = (inputData.data_value || '').split(',');
 const dataTypes = (inputData.data_type || '').split(',');

 // Prepare an output object to hold the enumerated fields
 output = {};

 // Loop through the values and types to create the output
 dataValues.forEach((value, index) => {
   const type = dataTypes[index] || 'UnknownType';
   const key = `${type}${output[type] ? Object.keys(output).filter(k => k.startsWith(type)).length + 1 : ''}`;
   output[key] = value.trim();
 });
- Test this step to verify the contact information is properly formatted.
Step 8: Search for Job Information
- Add a new ServiceTitan step.
- Choose "Search Jobs" as the action.
- In the "Type" field, map the "Appointments Job ID" from Step 3.
- Test this step to retrieve job details.
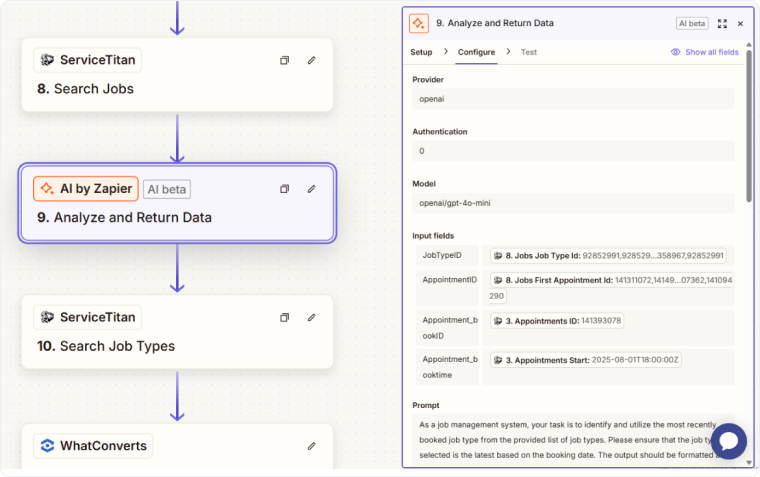
Step 9: Analyze Job Type with AI
- Add an "AI by Zapier" step.
- Select "openai" as the provider.
- Set the model to "openai/gpt-4o-mini".
- In the "Input fields" section, add these fields:
- Field name: JobTypeID, then map "Jobs Job Type Id" from Step 8
- Field name: AppointmentID, then map "Appointments ID" from Step 3
- Field name: Appointment_bookID, then map "Appointments Book ID" from Step 3
- Field name: Appointment_booktime, then map "Appointments Start" from Step 3
- In the "Prompt" field, enter:
None
As a job management system, your task is to identify and utilize the most recently booked job type from the provided list of job types. Please ensure that the job type selected is the latest based on the booking date. The output should be formatted as follows:
- Clearly specify the name of the job type.
- Include any relevant details associated with that job type, such as booking date, client name, or job description.
For example, if the list includes "Job A" booked on January 1, 2023, and "Job B" booked on January 5, 2023, the output should be:
- Job Type: Job B
- Booking Date: January 5, 2023
- Client Name: [Client Name]
- Job Description: [Job Description]
Make sure to replace the placeholders with actual details from the job type.
- Set "Return as an array of objects?" to "false".
- Test this step.
Step 10: Search for Job Type Details
- Add a new ServiceTitan step.
- Choose "Search Job Types" as the action.
- In the "Job Type ID" field, map the "Job Type" from Step 9 (the AI analysis output).
- Test this step.
Step 11: Create Lead in WhatConverts
- Add a "WhatConverts" step.
- Choose "Create Lead" as the action.
- Connect your WhatConverts account using your Profile ID and Secret Token.
- Map the fields into WhatConverts as needed.
- Test this step to create a test lead in WhatConverts.
- Verify the lead appears correctly in your WhatConverts account.
Activate Your Workflow
Once you've successfully tested all steps:
- Review the entire workflow to ensure all mappings are correct.
- Click "Publish" to activate the Zap.
- Monitor the first few appointments that come through to ensure everything works as expected.
Related Topics
Was this page helpful?
Get a FREE presentation of WhatConverts
One of our marketing experts will give you a full presentation of how WhatConverts can help you grow your business.
Schedule a Demo