


Set Up Acuity Appointment Tracking
WhatConverts can track appointments booked through Acuity Scheduling and capture complete marketing attribution for each appointment, showing which campaigns, keywords, and landing pages drive bookings.
Before You Begin
Before you can track Acuity appointments, you'll need:
- An active WhatConverts account
- An Acuity Scheduling account
- A Zapier account
- The WhatConverts tracking code installed on your website
Note: The WhatConverts tracking code must be the HTML version added directly to your website. You'll need to deactivate the WordPress Plugin or Google Tag Manager version and use the HTML tracking code above the Acuity Install Code.
Create an Acuity Intake Form
To create a custom intake form in Acuity:
- Log in to your Acuity Scheduling Dashboard.
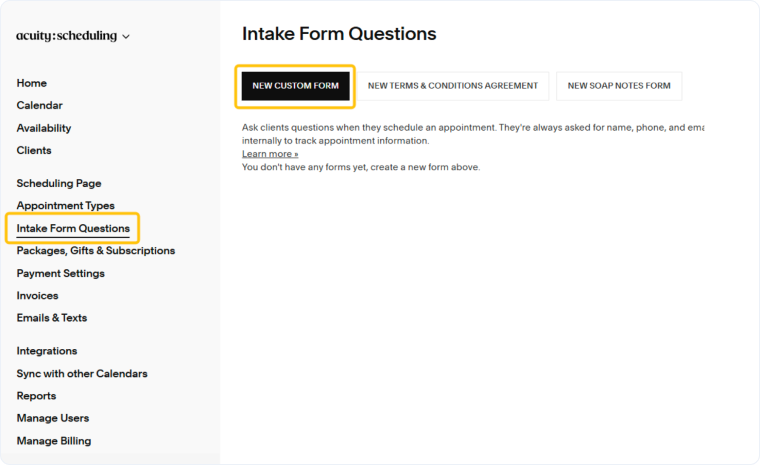
- Navigate to Intake Form Questions.
- Click "New Form".
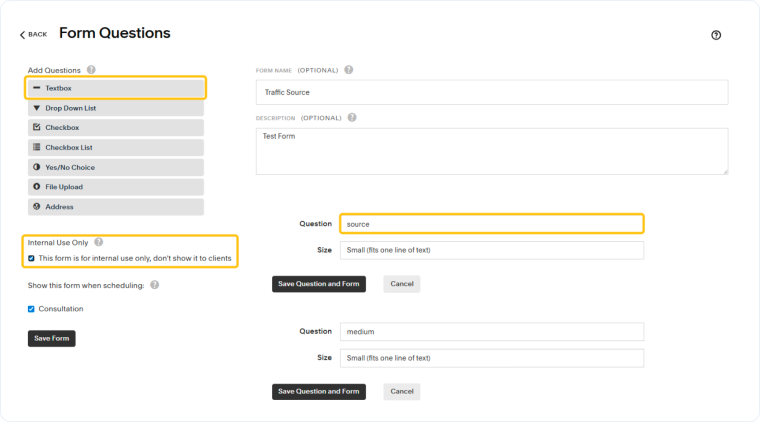
- Name your form "Traffic Source".
- Add a textbox field for each of the following:
- source
- medium
- campaign
- content
- keyword
- landing page
- user id
- msclkid
- gclid
- For each textbox field, check the box "This form is for internal use only, don't show it to client".
- Under Show this form when scheduling, select the checkbox for your appointment type.
- Select “Save Questions and Form”.
Customize Embed Code
To customize your Acuity embed code:
- Copy the JavaScript code provided below into a text editor
<iframe width="100%" height="800" frameBorder="0" id="online-booking"></iframe> <script src="https://ajax.googleapis.com/ajax/libs/jquery/1.12.4/jquery.min.js"></script> <script type="text/javascript"> $(document).ready(function() { var final_url = 'https://app.acuityscheduling.com/schedule.php?owner=YourOwnerNumber'; cookie = oqhaqzwnbjgcpycneryg('wc_client'); if (cookie) { var cookie_parts = cookie.split('+..+'); if (cookie_parts[0]) final_url += '&field:SourceIDNumber=' + cookie_parts[0]; if (cookie_parts[1]) final_url += '&field:MediumIDNumber=' + cookie_parts[1]; if (cookie_parts[2]) final_url += '&field:CampaignIDNumber=' + cookie_parts[2]; if (cookie_parts[3]) final_url += '&field:ContentIDNumber=' + cookie_parts[3]; if (cookie_parts[4]) final_url += '&field:KeywordIDNumber=' + cookie_parts[4]; if (cookie_parts[5]) final_url += '&field:GclidIDNumber=' + cookie_parts[5]; if (cookie_parts[6]) final_url += '&field:LandingPageIDNumber=' + cookie_parts[6]; if (cookie_parts[7]) final_url += '&field:UserIDNumber=' + cookie_parts[7]; if (cookie_parts[8]) final_url += '&field:MsclkidIDNumber=' + cookie_parts[8]; } $('#online-booking').attr('src', final_url.replace(/#038;/g, '')); }); </script> - For each custom field in your intake form, you'll need to replace the field name with the unique ID number:
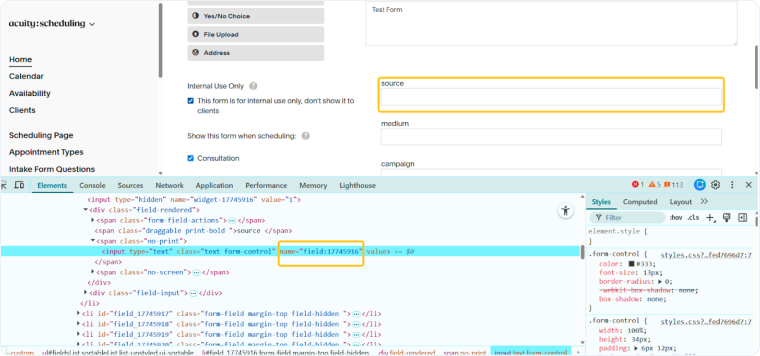
- Right-click the textbox field (e.g., "Source") in your Acuity intake form
- Click "Inspect" to view the HTML code
- Find the number following name= in the code (e.g., 4178402)
- In your text file, replace the field name (e.g., SourceIDNumber) with this number
- Repeat for all custom fields: source, medium, campaign, content, keyword, landing page, user id, msclkid, gclid
- Get your Owner ID:
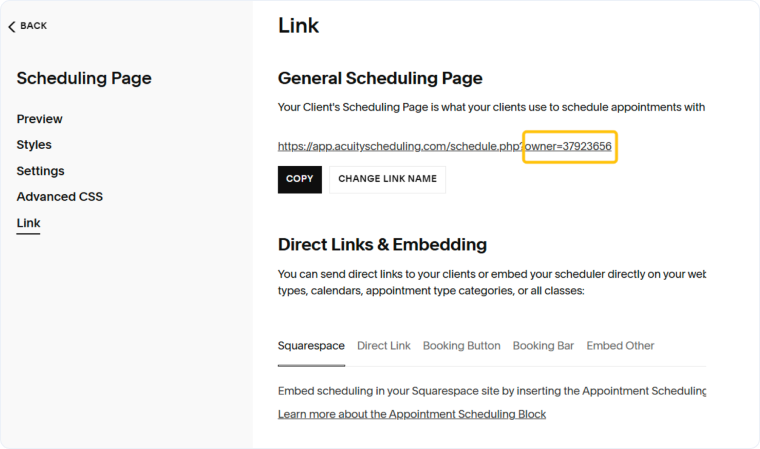
- In Acuity, navigate to “Scheduling Page”, then “Link”
- Locate the code ?owner=#### in the General Scheduling Page Link
- Copy from the question mark onward (e.g., ?owner=1234)
- Replace this value in your customized text file
- Replace your existing Acuity Embed Scheduler Code on your website with this customized code.
Set Up Zapier Integration
To create a Zap that sends Acuity appointments to WhatConverts:
- Log in to Zapier and click "Create Zap".
- Select “Acuity Scheduling” as your Trigger app.
- Select "New Appointment" as your Trigger Event. Click "Continue".
- Connect your Acuity account and follow the prompts to test your trigger.
- Review the appointment data returned and click "Continue".
- Select WhatConverts as your Action app.
- Select "Create Lead" as your Action Event.
- Click "Continue".
- Connect your WhatConverts account (see our Connect WhatConverts to Zapier article for detailed instructions).
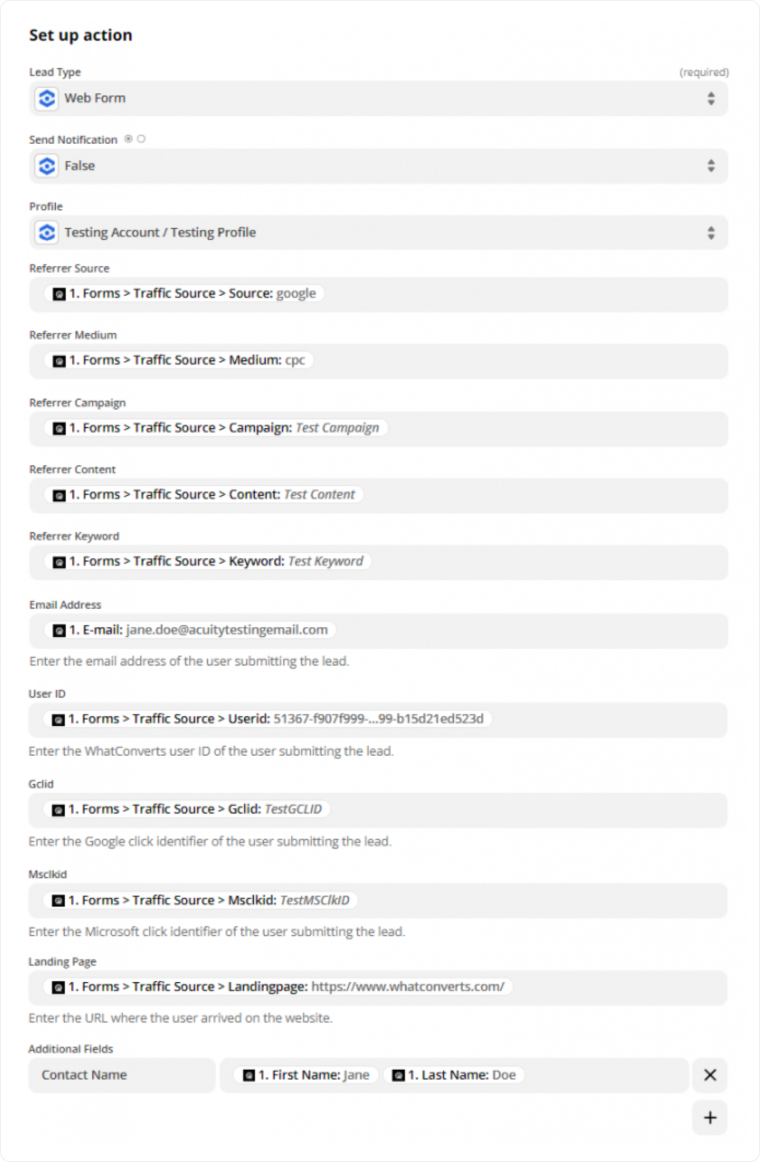
- On the Set up action page:
- Set Lead Type to "Web Form"
- Select your WhatConverts Profile from the dropdown
- Map the following fields from your Acuity intake form to WhatConverts:
- Referrer Source → source field
- Referrer Medium → medium field
- Referrer Campaign → campaign field
- Referrer Content → content field
- Referrer Keyword → keyword field
- Landing Page → landing page field
- MSClkid → msclkid field
- User ID → user id field
- Gclid → gclid field
- Optionally, map additional contact and data fields (Email, Name, Phone Number, Appointment Details, etc.)
- Click "Continue".
- Click "Test & Continue" to send a test lead to WhatConverts.
- Turn your Zap on by clicking the toggle.
Verify in WhatConverts
Follow these steps to verify appointments are tracking correctly:
- Log in to your WhatConverts profile.
- Access the Lead Manager.
- Under Lead Manager, locate your Acuity Scheduling appointment form.
- Review the lead details to confirm marketing attribution data is being captured.
Once setup is complete, each Acuity appointment will appear in WhatConverts as a web form lead with complete marketing attribution.
Related Topics
Get a FREE presentation of WhatConverts
One of our marketing experts will give you a full presentation of how WhatConverts can help you grow your business.
Schedule a Demo