


Set Up Your Account
Once your account has been approved and you’ve logged in for the first time, you’ll be guided through a short setup flow. This ensures your account is configured to start tracking leads properly.
Note:
- Time required: 5 - 10 minutes.
- You’ll need: your company details, website URL, and tracking preferences
Step 1: Enter Additional Company Details
Start by confirming the basics of your business.
- Confirm Company Name and Phone Number (already pre-filled).
- Confirm the Company Website where leads will be tracked (already pre-filled).
- Select your industry and, optionally, sub-industry.
- Accept the terms and click “Continue”.

Note: You can track more than one website. Additional websites and profiles can be added later from your Account Settings.
Step 2: Select Marketing Channels
Tell WhatConverts which channels you want to track leads from. This will help us adapt to your tracking needs.
- Choose which channels you’d like to track leads from.
- Click “Continue”.

Tip: You can always add or change channels later in your account settings.
Note: The needed tracking numbers to fulfill your tracking requirements for the channels selected will be automatically created.
Step 3: Set Up Your Tracking Numbers
Now, configure phone numbers for call tracking.
- Select Local or Toll-free numbers.
- Pick your Area Code.
- Enter the Phone Number where calls should be forwarded to (typically the one displayed on your website).
- Optionally, enable “Record all incoming calls (Free)”.
- Click “Continue”.
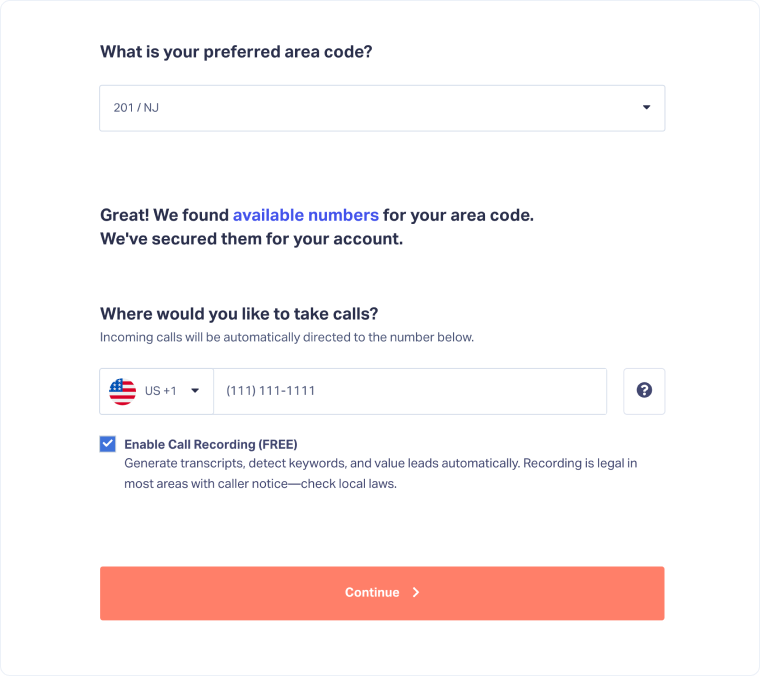
Note: Local numbers often improve trust and call-through rates, while toll-free numbers can be better for national or multi-region campaigns. Select the option that best matches your audience and business reach.
Step 4: Set Up Your Forms
Connect your forms so submissions are captured as leads.
- Paste the URL of your site with forms to track. Click “Find Forms”.
- WhatConverts will scan your website and automatically detect available forms.
- Select the forms you’d like to track.
- Click “Continue”.

Note: If you don’t see a form listed, you can always add it later from your profile by going to Tracking > Forms.
Step 5: Install the WhatConverts Tracking Code
Install the tracking code so all your leads are tracked and appropriately attributed.
- Choose whether to install the code yourself or have your developer install it.
- Have my developer install code: Enter their email and we’ll send instructions.
- Install code myself: Choose one of the following options.
- Use WordPress
- Google Tag Manager
- Manual Installation
- Once installed, click Verify Installation or Skip for Now if you’d like to complete this later.
Final Step: Access Your WhatConverts Account
After setup, you’ll see a summary of your tracking numbers and forms. Click “Take me to WhatConverts” to enter your account dashboard.
Congratulations, your account is set up! You can now begin tracking leads and proving marketing ROI.
Related Topics
Get a FREE presentation of WhatConverts
One of our marketing experts will give you a full presentation of how WhatConverts can help you grow your business.
Schedule a Demo


