Help Center ▸ Communication Call Flow Menu Options & Settings
Call Flow Option Items:
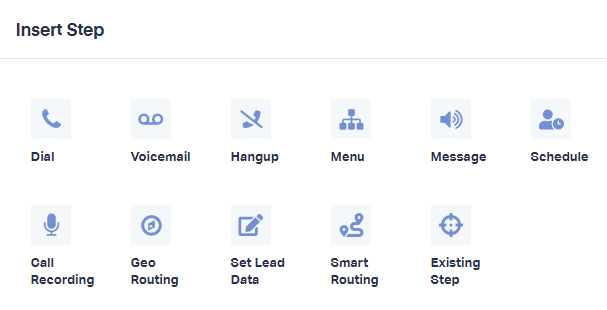
Call Recording
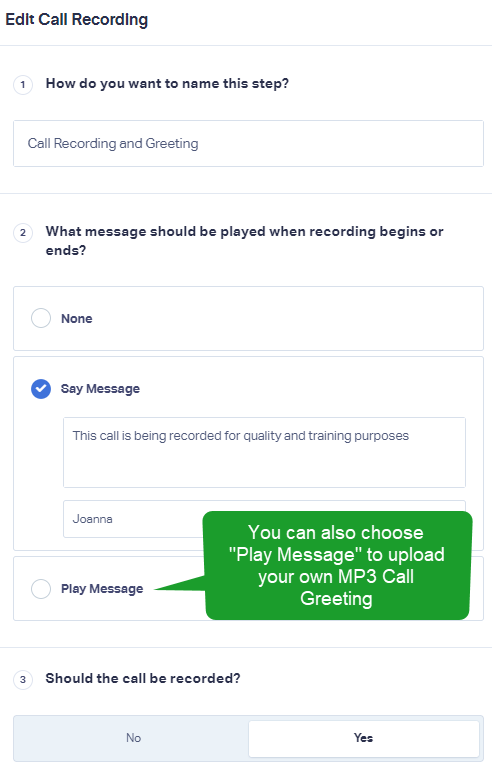
Anytime you create a new Call Flow, the first step is to edit the Call Recording step to "Enable" or "Disable" your Call Recording and/or Call Greeting.
Dial
The Dial step is used to connect your call flow to a destination. For more information see: Setting up a Basic Dial Call Flow.
Inside of the Dial step, you will be able to set the following options:
- A Name for the step.
- The Dial Type. You can choose to ring directly to a destination or ring multiple destination numbers in either a Round Robin or Multi-Ring style.
- The Phone Type and destination number(s).
- The Dial Timeout before moving onto the next step.
- The Caller ID shown at the destination.
- A Call Whisper that the Call Recipient will hear when they answer the phone.
- A Post-Call Flow.
Menu
The Menu step will allow you to set up a Menu that will guide a caller to the correct destination for their inquiry. For full information see: Setting up a Simple Menu Call Flow.
Inside of the Menu step, you will be able to set the following options:
- A Name for the step.
- A Message. This will be the message that plays to the caller. The caller can choose a selection to move onto the next step of your Call Flow. Choose from "None", "Say Message" and type in a message for an automated voice to read or "Play Recording" to upload your own MP3 menu recording.
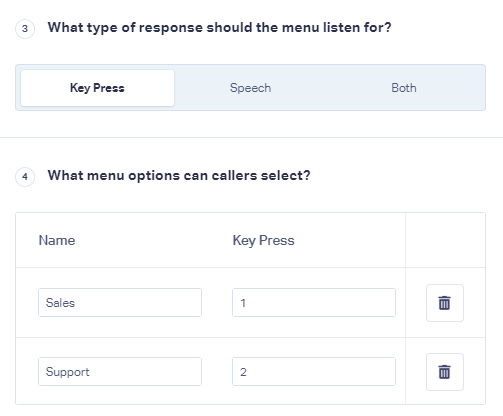
- The Response Type. Choose from "Key Press" for numerical menu options, "Speech" for speech recognition for menu options or "<strongBoth" to recognize both.
- The Caller's Language option will appear if a "Speech" or "Both" is chosen as the response type.
- The Menu Options. This is where the options for the caller to select are set. In the example below, the Key Press for 1 is Sales and 2 is for Support.
- The Response Timeout. This is the number of seconds that the step will wait for a response from the caller before moving onto the next step.
- The No Response Message. This is a message that plays to the caller if they do not choose a valid menu option or if they make no selection. You can choose "None", "Say Message" and type in a message for an automated voice to read or "Play Recording" to upload your own MP3.
Schedule
The Schedule step will allow you to set up specific times or days for calls to be routed to your set destinations.
For full information see: How to set up a Scheduled Business Hours Call Flow.
Inside of the Schedule step, you will be able to set the following options:
- A Name for the step.
- A Timezone. This allows you to choose the timezone for the scheduled hours.
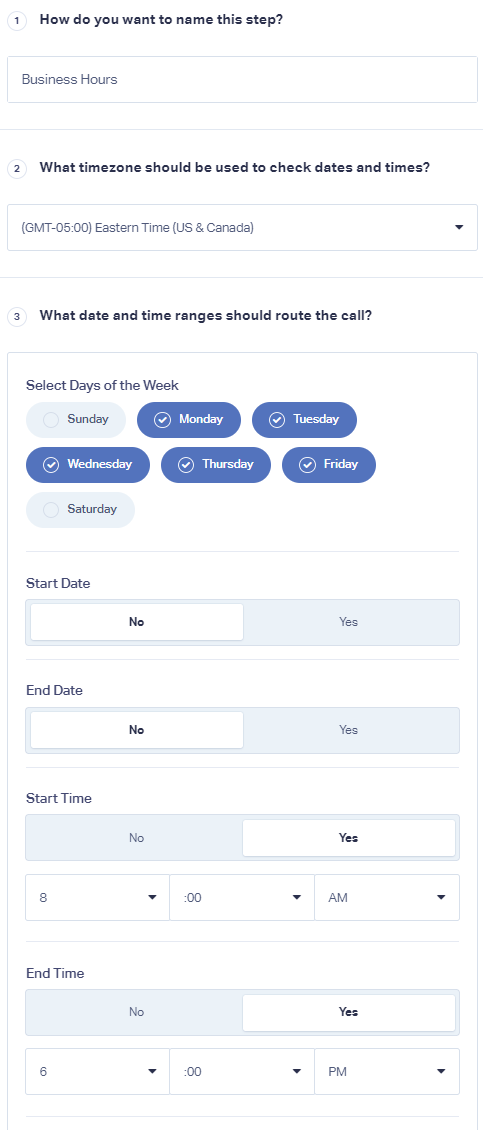
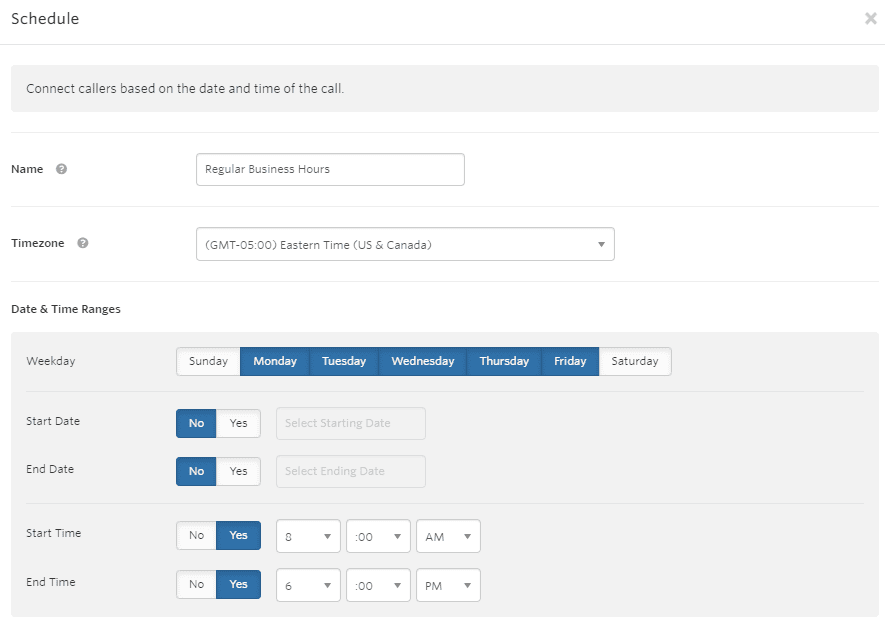
- Date & Time Ranges. This allows you choose what times of day and which days you would like to route your calls. You can choose if there is a start date, end date and/or the start and end times for your routing. Below is an example of a schedule to route calls Monday through Friday, 8:00 am to 6:00 pm.
Geo-Routing
The Geo-Routing step will allow you to route a caller to a destination based on the caller's area code, state/region or country they are calling from.
Inside of the Geo-Routing step, you will be able to set the following options:
- A Name for the step.
- Names for your routing.
- Set up multiple locations for different routing possibilities by caller's Country, State or Area Code (Prefix).
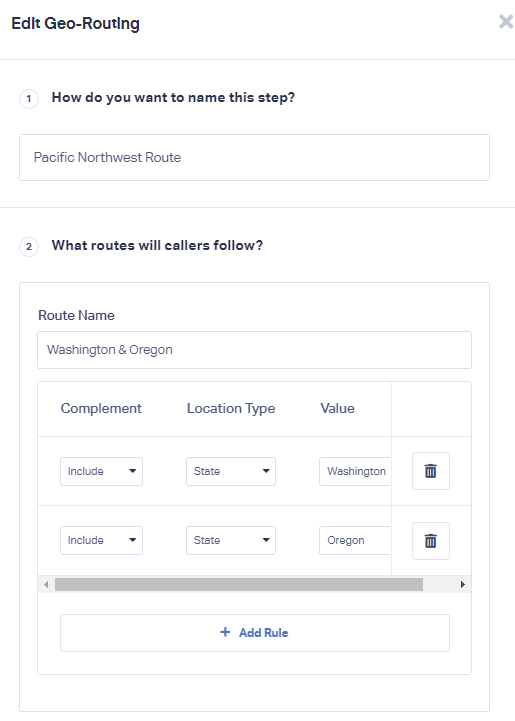
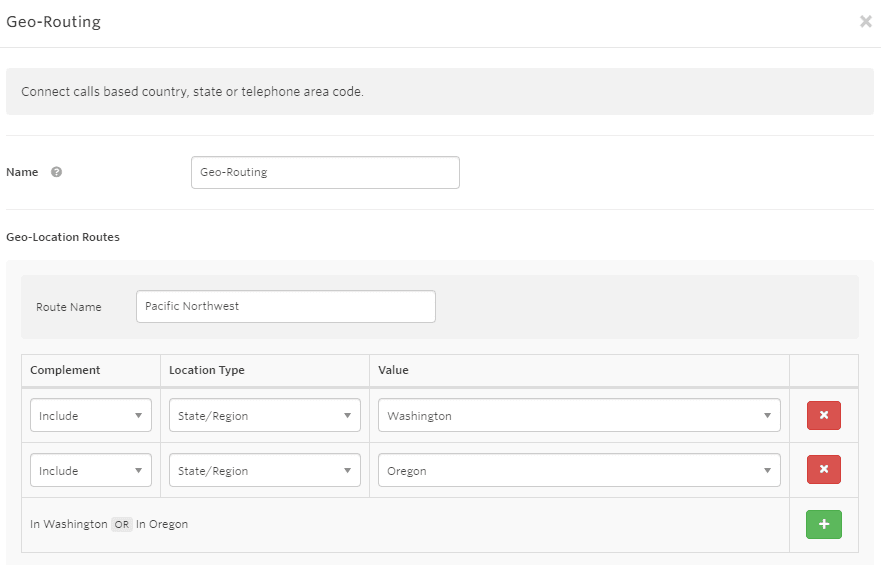
Below is an example of the Geo-Routing step to filter a group of callers to Washington and Oregon.
Message
The Message step will play a message to a caller. You can choose to "Say Message" (you can type in a message to be played by your chosen automated voice) or "Play Recording" (you can upload an MP3 message of your choosing to play to callers).
Voicemail
The Voicemail option will add a voicemail step that will play to your callers. It is best to append a Voicemail step after your dial steps if the call goes unanswered.
Note:
When choosing the Voicemail step, keep in mind the Timeout in any of your Dial steps. If you have a destination phone that has voicemail set up, you will want to make sure that the timeout duration is shorter than how long it takes for your destination phone to go to voicemail.
For example, if your personal voicemail is set to begin after ringing for 30 seconds with no answer, you'll want to make sure the timeout in your dial step is between 20 and 29 seconds to ensure the call reaches your WhatConverts Voicemail step.
Set Lead Data
The Set Lead Data option will allow you to add, set or customize lead data (such as Quote Value, Sales Value, Quotable status or Custom Fields) based on the step of the Call Flow.
For full information on the Set Lead Data step and setup information, see: Automatically Qualify Calls or Add Data to a Call in a Call Flow.
Smart Routing
The Smart Routing step allows you to route calls based on a specific data point from an incoming call.
Inside of the Smart Routing step, you will be able to set the following options:
- A Name for the step.
- Name(s) for the Smart Route(s).
- Set up Smart Routing based on the following from an incoming lead:
- Browser
- Campaign
- Content
- Device Make
- Device Type
- IP Address
- Keyword
- Landing Page
- Lead Page
- Medium
- Operating System
- Phone Number Title
- Quotable
- Repeat Caller
- Repeat Lead
- Source
- Tracking Phone Number
- Unbounce Page ID
- Unbounce Variant ID
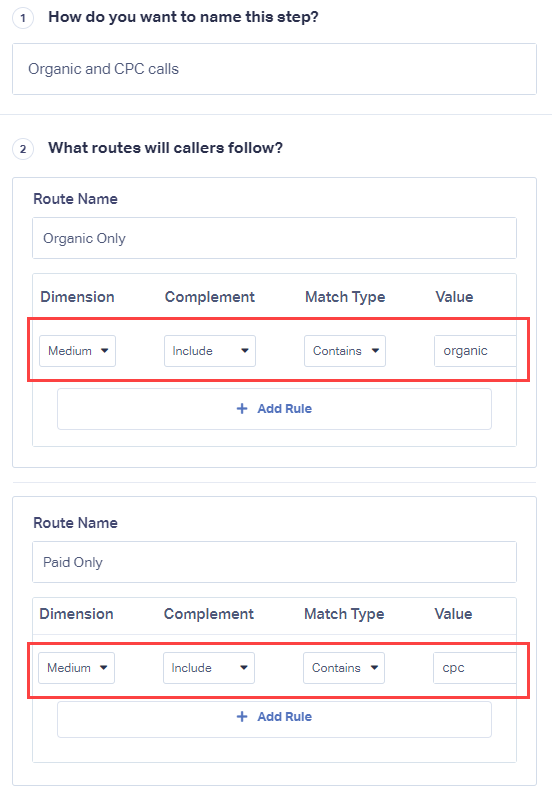
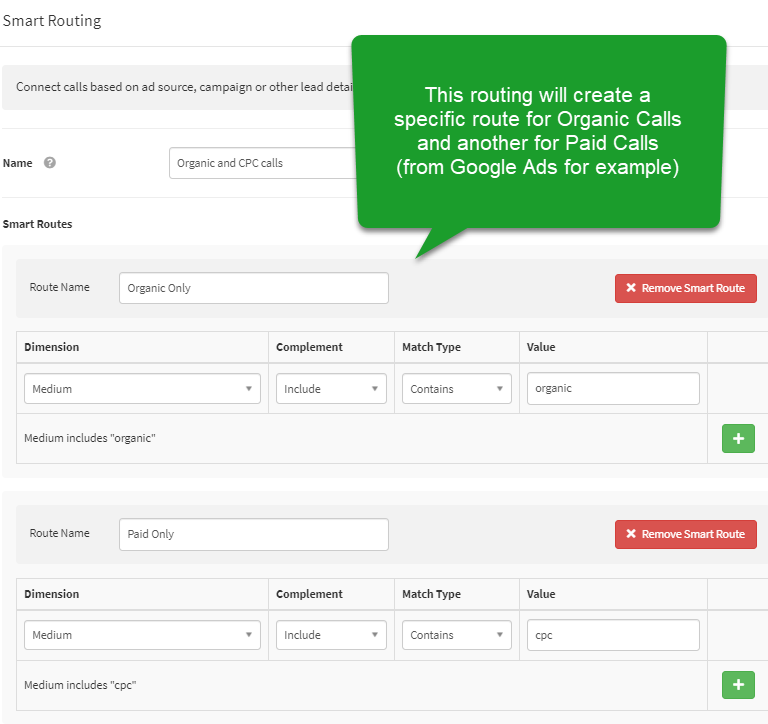
Below is an example of the Smart Routing step to filter callers based on Organic or Paid (cpc) incoming calls.
Hangup
The Hangup step will hang up a call when it is reached.
Existing Step
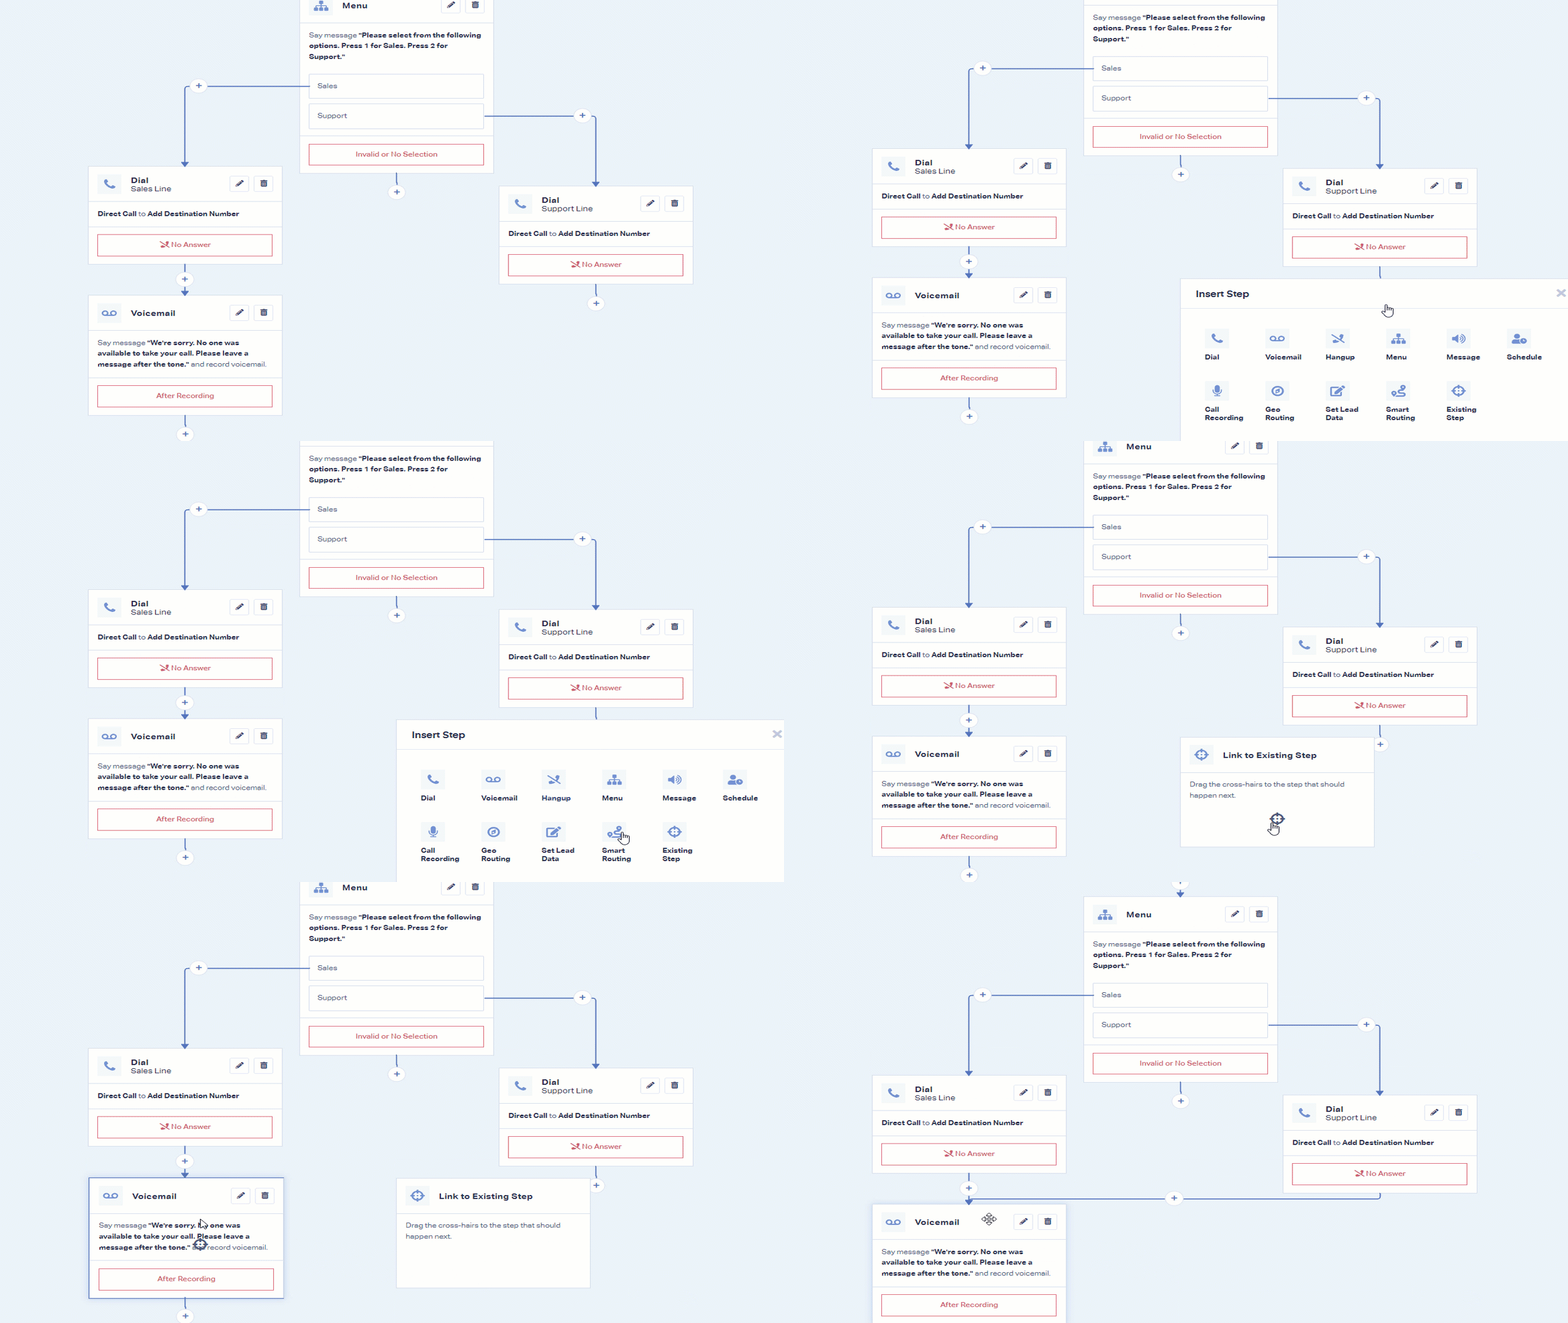
The Existing Step option allows you to connect the end of one step to another that previously exists. The image below shows how to use the Existing Step option to link a Dial step to an existing Voicemail step.
If you have any questions, please contact us here: Contact WhatConverts Support or email support@whatconverts.com
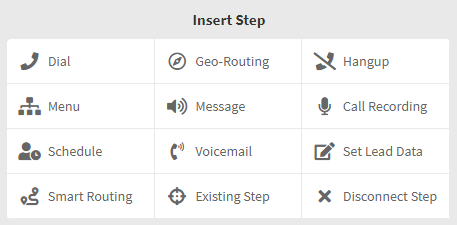
When setting up a new Call Flow from scratch in WhatConverts, you can customize your call routing every step of the way.
Here are the Call Flow Option Items available in Call Flows:
Call Recording
Anytime you create a new Call Flow, the first step is to toggle "On" or "Off" your Call Recording. When switching "On" Call Recording, a prompt will appear to give your step a Name to identify the step, set a prompt for call recording ("This call is being recorded for quality assurance."), select "Yes" or "No" for Call Recording and save the step.
Dial
The Dial step is used to connect your call flow to a destination. For more information see: Setting up a Basic Dial Call Flow.
Inside of the Dial step, you will be able to set the following options:
- A Name for the step.
- The Dial Type. You can choose to ring directly to a destination or ring multiple destination numbers in either a Round Robin or Multi-Ring style.
- The Phone Type and destination number(s).
- The Dial Timeout before moving onto the next step.
- The Caller ID shown at the destination.
- A Call Whisper that the Call Recipient will hear when they answer the phone.
- A Post-Call Flow.
Menu
The Menu step will allow you to set up a Menu that will guide a caller to the correct destination for their inquiry. For full information see: Setting up a Simple Menu Call Flow.
Inside of the Menu step, you will be able to set the following options:
- A Name for the step.
- A Prompt Type. This will be the message that plays to the caller. The caller can choose a selection to move onto the next step of your Call Flow. Choose from "None", "Say Message" and type in a message for an automated voice to read or "Play Recording" to upload your own menu recording.
- The Response Type. Choose from "Key Press" for numerical menu options, "Speech" for speech recognition for menu options or "Key Press or Speech" to recognize both.
Caller's Language
option will appear if a "
Speech
" response type is chosen.
- The Menu Options.
- The Response Timeout before moving onto the next step.
- The No Response Message. You can choose "None", "Say Message" and type in a message for an automated voice to read or "Play Recording"
Schedule
The Schedule step will allow you to set up specific times or days for calls to be routed to your set destinations.
For full information see: How to set up a Scheduled Business Hours Call Flow.
Inside of the Schedule step, you will be able to set the following options:
- A Name for the step.
- A Timezone. This allows you to choose the timezone for the scheduled hours.
- Date & Time Ranges. This allows you choose what times of day and which days you would like to route your calls. You can choose if there is a start date, end date and/or the start and end times for your routing. Below is an example of a schedule to route calls Monday through Friday, 8:00 am to 6:00 pm.
Geo-Routing
The Geo-Routing step will allow you to route a caller to a destination based on the caller's area code, state/region or country they are calling from.
Inside of the Geo-Routing step, you will be able to set the following options:
- A Name for the step.
- Names for your routing.
- Set up multiple locations for different routing possibilities.
Below is an example of the Geo-Routing step to filter a group of callers to Washington and Oregon.
Message
The Message step will play a message to a caller. You can choose to "Say Message" (you can type in a message to be played by your chosen automated voice) or "Play Recording" (you can upload an MP3 message of your choosing to play to callers).
Voicemail
The Voicemail option will add a voicemail step along your call flow. It is best to append a Voicemail step after your dial steps.
Note:
Voicemail
Timeout
Dial
steps. If you have a destination phone that has voicemail set up, you will want to make sure that the timeout duration is shorter than how long it takes for your destination phone to go to voicemail. For example, if your personal voicemail is set to begin after ringing for 30 seconds, you'll want to make sure the timeout in your dial step is between 20 and 29 seconds to ensure the call reaches your Voicemail step.
Set Lead Data
The Set Lead Data option will allow you to add, set or customize lead data (such as Quote Value, Sales Value, Quotable status or Custom Fields) based on the step of the Call Flow.
For full information on the Set Lead Data step and setup information, see: Automatically Qualify Calls or Add Data to a Call in a Call Flow.
Smart Routing
The Smart Routing step allows you to route calls based on a specific data point from an incoming call.
Inside of the Smart Routing step, you will be able to set the following options:
- A Name for the step.
- Name(s) for the Smart Route(s).
- Set up Smart Routing based on the following from an incoming lead:
- Browser
- Campaign
- Content
- Device Make
- Device Type
- IP Address
- Keyword
- Landing Page
- Lead Page
- Medium
- Operating System
- Phone Number Title
- Quotable
- Repeat Caller
- Repeat Lead
- Source
- Tracking Phone Number
- Unbounce Page ID
- Unbounce Variant ID
Below is an example of the Smart Routing step to filter callers based on Organic or Paid (cpc) incoming calls.
Hangup
The Hangup step will hang up a call when it is reached.
Existing Step
The Existing Step option allows you to connect the end of one step to another that previously exists. The image below shows how to use the Existing Step option to link a Dial step to an existing Voicemail step.

Was this page helpful?👍Yes
👎No
Get a FREE presentation of WhatConverts
One of our marketing experts will give you a full presentation of how WhatConverts can help you grow your business.
Schedule a Demo 


