

Endpoints
In this guide, we’ll walk you through sending data to your WhatConverts account using endpoints.
Prefer a video walkthrough? Click here.
Step 1: Getting Started with WhatConverts
To begin, log in to your WhatConverts account. Once you're logged in, navigate to the top of the page and:
- Click on the Tracking tab.
- Select Integrations from the dropdown.
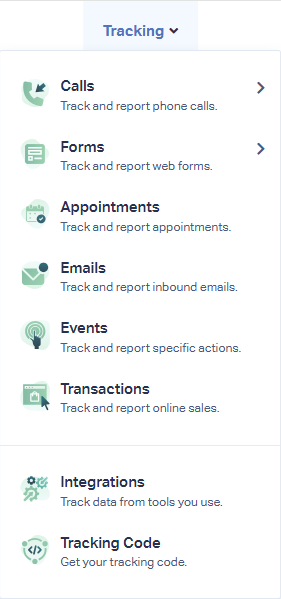
This will take you to the Integrations page, where you can manage your data connections.
Step 2: Navigating to Endpoints
On the Integrations page:
- Click on the Automation tab.
- Click on Endpoints.
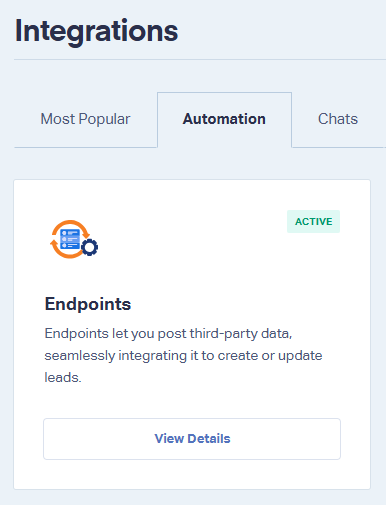
On the Endpoints page, click the Add Endpoint button. This is where you'll set up a new data connection for your lead details.
Step 3: Choosing Your File Format
Now that you're on the Endpoints page, you need to choose your file format: CSV or JSON. For this guide we'll choose CSV, but you can also find more detailed JSON instructions here.
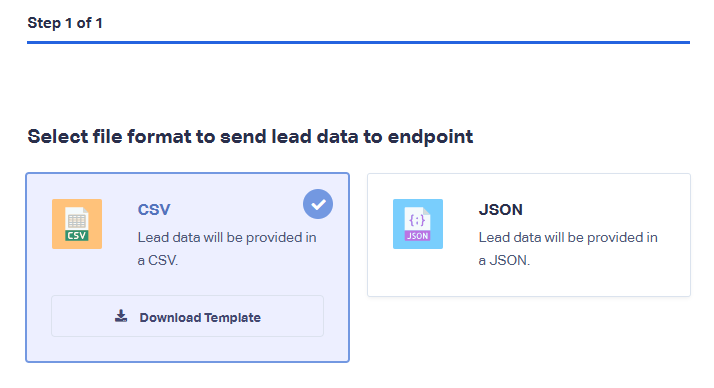
Download the CSV Template
Make sure to download the template provided. This will guide you in formatting your data correctly.
Step 4: Setting Rules for Processing Lead Data
With your file format selected, it's time to set up rules for how the lead data should be processed from the endpoint:
Rules:
- If lead already exists:
- Update existing lead with endpoint data
- Create new lead from endpoint data
- Don’t take any action
- If lead includes attribution data:
- Update lead attribution with endpoint data
- Don’t modify lead attribution data
- Default lead type:
- Appointment
- Chat
- Event
- Other
- Phone call
- Text Message
- Transaction
- Web Form
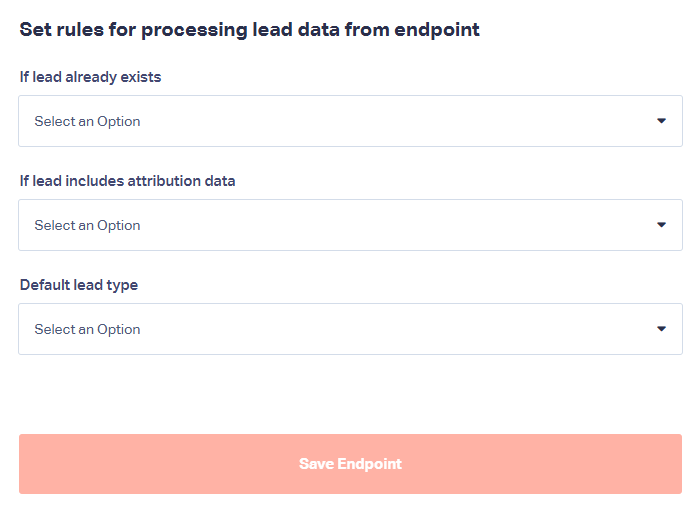
Click Save Endpoint after setting your rules, and ensure you copy the generated Endpoint URL as you’ll need it later.
Step 5: Preparing Your CSV File
- Open the downloaded CSV template and add your data to the columns provided. The following columns are mandatory. Without them, the CSV template can’t be processed.
- Profile ID
- Date
- Ensure your date column uses the following format: YYYY-MM-DD.
- CSV Additional Fields: If would like to add additional fields to your leads, please add the following column to the CSV template: [additional_field]NameOfField
- JSON Additional Fields: If you are using the JSON file format and would like to add additional fields, please add the following to the JSON template:
"additional_fields":
{
"FieldName":"EnterValue"
} - Save your file.
Step 6: Sending Data Using an API Tool
With your data prepared, it's time to send it to WhatConverts through your endpoint. This requires utilizing a tool capable of making HTTP requests, such as Postman.
- Open Postman and create a new request.
- Set the request type to POST.
- Enter your copied Endpoint URL from step 4.

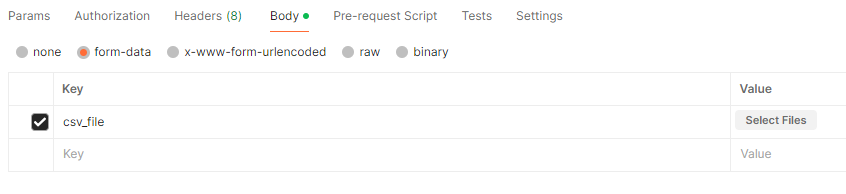
Uploading Your CSV Template
After creating the request:
- Head over to the Body tab.
- Select form-data.
- Enter csv_file as your key.
- In the value field, upload the CSV template.
Step 7: Sending Your Data
Click the Send button in Postman and wait for the confirmation that your data has been sent successfully.
Conclusion: Verifying the Data in WhatConverts
Finally, head back to your WhatConverts account and go to the Leads page. Your new leads should now be visible.
With this guide, you're well prepared to handle data integration smoothly and efficiently. Keep this guide handy as a reference whenever you need to send leads to WhatConverts.
If you have any questions, please contact WhatConverts Support or email support@whatconverts.com
Get a FREE presentation of WhatConverts
One of our marketing experts will give you a full presentation of how WhatConverts can help you grow your business.
Schedule a Demo


